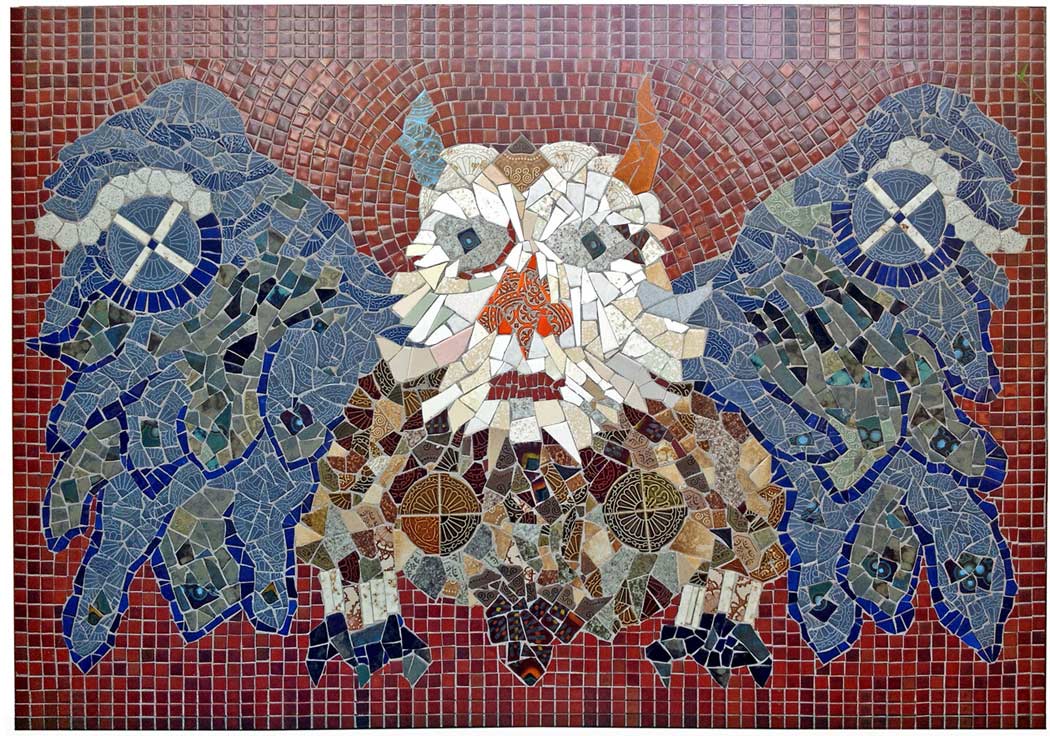
HE-SHE BEAST 1976
My first mosaic
He-She Beast 54" x 78"
SOMETHING DIFFERENT
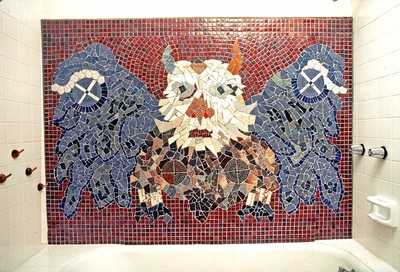
In 1976 we were living in an old (1917) stucco California bungalow in Berkeley that had one small bathroom with an old but very large claw-foot metal tub. After ten years without a built-in shower, we decided that we wanted one, which meant we needed to tile the plaster walls around the tub.
As usual, we thought we could do whatever was needed ourselves, and we did. I went to Tile Town in Oakland (long gone) and while looking at various tile samples, I saw a dozen or more clear plastic bags in the back room filled with broken tiles of various colors. The guy said they were leftovers from wrecked shipping and old installation jobs, and I should just take them all, as is, free, just get them out of there. Free is always the best price, but I did not count on the time I was to spend with this gift. It took months to sort out the tile shards by colors on the floor of our garage.
|
INSPIRATION
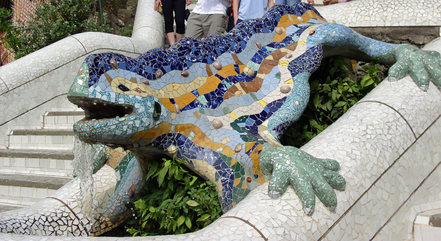
I knew nothing about making mosaics, but since I had broken tiles to work with, I turned for inspiration to the mosaic work in Gaudi’s eccentric and magical architecture, especially his Park Güell. Gaudi's mosaics in Barcelona are made with ceramic tiles, mostly of broken pieces fit into free-form patterns. I wanted to work with clearly defined figures but rendered with improvisation. I would be making this up as I went along. |
Antoni Gaudi - the dragon in Park Güell
|
DESIGN

THE ORIGIN OF THE HE-SHE BEAST
I was drawing cartoons for a Berkeley political newspaper, Grassroots, and in 1975 I illustrated the paper’s recommendations for the April election. For a Proposition to eliminate sex-biased terminology in the city charter, I drew a He-She beast. This drawing was the source of the image for the mosaic wall behind the old bathtub.
I was drawing cartoons for a Berkeley political newspaper, Grassroots, and in 1975 I illustrated the paper’s recommendations for the April election. For a Proposition to eliminate sex-biased terminology in the city charter, I drew a He-She beast. This drawing was the source of the image for the mosaic wall behind the old bathtub.
THE MOSAIC
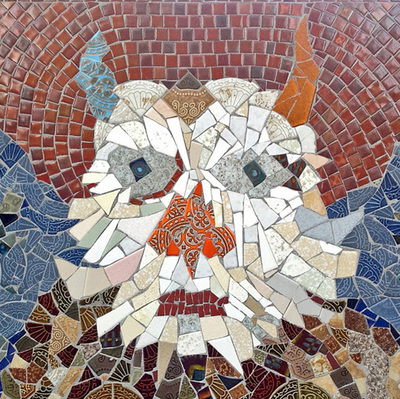
Since all the broken tiles were irregular, I took irregularity as a formal given. The two eyes are similar but different. The nose-beak is asymmetrical as are the mouth and the face. There is an implied symmetry, but it is broken at every point, in every section, both in shapes, in color, and in size and number of tile pieces. To emphasize this irregularity, the two horns are not only different in overall shape and tile sizes but also in color. And yet, because the eyes stare as they do, the impression is that of symmetry.
Since all the broken tiles were irregular, I took irregularity as a formal given. The two eyes are similar but different. The nose-beak is asymmetrical as are the mouth and the face. There is an implied symmetry, but it is broken at every point, in every section, both in shapes, in color, and in size and number of tile pieces. To emphasize this irregularity, the two horns are not only different in overall shape and tile sizes but also in color. And yet, because the eyes stare as they do, the impression is that of symmetry.
FABRICATION
Please note: The following section explains the process I developed and used in most of my mosaic works, with some specific adaptations for special cases.
I cut a panel of marine plywood (Panel A) to fit the width of the wall. I placed this panel on my worktable and drew a rough sketch of the beast on it.
I then sprayed the plywood surface with a tacky glue to hold the tiles in place while I built the image from the broken tiles. I found that the 3M 75 Repositionable Clear Spray Adhesive worked best, kept the tiles from slipping at a c.30-degree incline but left them removable when needed.
From the large number of broken tiles sorted into shallow cardboard boxes by color and pattern, I started the face with the shapes already available, as if the image was a puzzle I was assembling. I did buy a simple tile cutter or nipper, but I only used it when I couldn’t find a piece of the right color and shape for a location, and later when filling in the background.
Many of the tiles I used for the background were part of my hoard of broken tiles, but I bought enough new ones to complete the background.
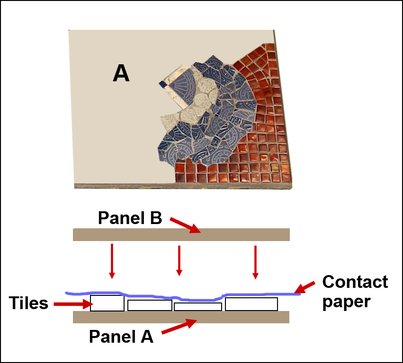
SETTING THE MOSAIC ON PLYWOOD SUPPORT
The variety of tiles presented a problem not present when one uses all of the same stock of tiles: the pieces varied in thickness, from about an eighth to a quarter-inch thick. This irregularity would be a hazardous problem for a shower wall. I had to find a process to eliminate it.
Once I had completed the image was done to my satisfaction, I covered the tiles with clear contact paper, overlapping the sheets for security. Then I covered this layer of contact paper with a sheet of ¾” plywood (Panel B) that was identical in size to Panel B, clamped the two plywood sheets together with the mosaic and contact paper in between, and with help from a friend, flipped over the whole sandwich of tiles on plywood.
We removed the base plywood (Panel A), now on top. This panel was to be the final support for the mosaic. Then the kraft paper with the original drawing was removed. The adhesive of the contact paper on the glazed front surfaces of the tiles was stronger than the sticky spray glue on the paper touching the back of the tiles, so the paper came off the tiles easily without disturbing their placement. If any tiles moved, it was easy to reposition them.
Now the mosaic was upside down, its face flat and flush on the bottom support, creating the even surface required for use in the shower. The bottoms of the tiles, however, were irregular in height, since with all the variation of tiles there was a difference of thickness up to about one-eighth of an inch, sometimes more. This irregularity was to be absorbed by the mortar that was to hold the tiles to the supporting panel.
INSTALLATION
At this point it was necessary to make preparations for securing the finished mosaic to the bathroom wall. Knowing that the mosaic would be quite heavy I planned to mount it by lag bolts to the wall studs. I transferred the positions of these studs close to the top and bottom edges of the mosaic, and flipped the tiles in those spots so they would be visible when the setting was done. These flipped tiles were then removed and holes for the bolts were drilled through the plywood support.
The next step was to attach metal lath to the surface of Panel A. The open grid of the lath would hold the thin-set mortar which in turn would hold the tiles. When Panel A was covered with the mortar I spread thin-set mortar with a trowel over the back of the tiles resting on Panel B. (Thin-set is an adhesive mortar made of cement, fine sand, and a water-retaining agent.)
While the mortar was still fresh and wet we set Panel B, lath and mortar down, on top of Panel A, completing the sandwich. After aligning the two boards exactly I clamped them together along the edges, piled as many heavy objects as I could on the top panel, and let the mortar set overnight.
The next day, while the panel with the tiles and the mortar was heavy, it was easy to lift it off the bottom panel since the mosaic was covered by the clear contact sheets. Flipped to the mosaic side up, I saw that the mortar had filled in most of the spaces between the tiles to the level of the contact sheets, acting as grout. With the cement set, the contact paper was easy to peel off the tiles, and a small amount of fresh thin-set spread over the face of the mosaic and rubbed down was enough to fill the gaps in the grout lines. When dry, the mortar film was rubbed off with coarse burlap.
Prying out the flipped tiles marking the stud positions was also easy, since the cement, though set, was still not set hard. With these tiles removed, I drilled holes through the support plywood for the lag bolts to go through to the studs in the wall, then temporarily set back the tiles and numbered them for proper replacement after the installation.
I followed the same process for the two additional narrow sections positioned above and below the main panel. I used this process for all of my future mosaics mounted on plywood or cement boards. When the works were too large for a single support board, I had to devise a different method which I will describe later.
When we sold the Berkeley house in 1978, I was able to remove the mosaic by detaching the temporary tiles and unscrewing the bolts from the studs. I then re-tiled the wall with the buyer’s choice of tiles, and the He-She Beast went with us to our new home in Mendocino.
